
Breaking Down the TCP Idle Scan
I’m currently making my way through “Metasploit: The Penetration Tester’s Guide” (along with a couple other books that’ll be in future posts). Chapter 3 is about information gathering - the process of gathering intelligence on your target so that you can then devise a method of attack. In the active information gathering section, it brings up TCP idle scanning using Metasploit and Nmap. Now I read a blog post on the PaulDotCom website awhile back on TCP idle scanning, but not knowing about this type of scan before reading the blog post, I was a little lost. Here’s the link to the blog post on the PaulDotCom website:
New IDLE scan sees through your firewall to scan hosts inside your network!
So now that I’ve come across it in the Metasploit book, I decided it was time to read up on it more and have a good understanding before going further into the book. After all, without good information gathering, you’re going to have issues when it comes to planning attack vectors.
The basic idea behind idle scanning is that you’re able to scan a target without ever sending a packet to the target containing your IP address. This works by sending forged packets to the target that make it look like it’s coming from another host that is idly standing by (I assume this is where it got its name “idle scan”?). This idle host is often referred to as a “zombie” host.
Finding your zombie host
Both Nmap and Metasploit are able to automate this process.
But I wanted to know what the process was that’s being automated. So I started with two things:
- Used the “–packet-trace” option when I executed the Nmap command.
- Had Wireshark sniffing the traffic while I ran the Nmap command.
The Nmap command I used was:
nmap --packet-trace --script ipidseq --script-args probe-port=80 192.168.1.13
The packet trace portion of the Nmap scan can be seen below:
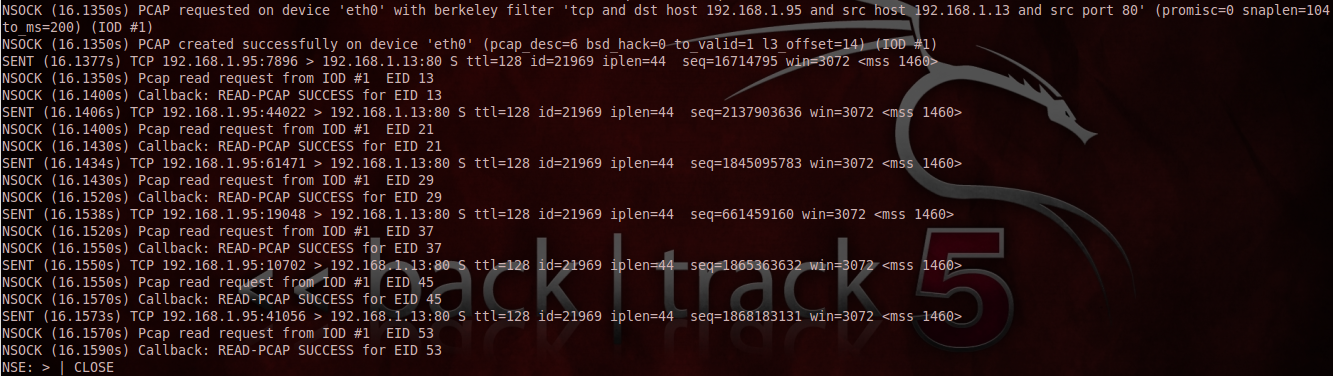
From this screenshot you can see that the script starts PCAP to capture the replies from the target. Nmap then sends SYN packets to the target, then PCAP captures the replies for analysis.
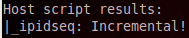
Then you get a print out showing the results of said analysis. In this case, the IP ID sequence is incremental, which is what we’re looking for in a zombie host. From these screenshots, we’re unable to see what’s being analyzed though. Because of this, I re-ran the scan, this time running Wireshark at the same time.

The above screenshot shows the result of one SYN packet being sent by Nmap to the target. You can see the SYN/ACK sent by the target in return, then the attacker sending a RST packet. What we want to see is in the IP header of the SYN/ACK packet sent by the target to the attacker.

The above image shows the IP identification number of the packet, which is “23546”. This was the first of six reply packets sent by the target. If you look at the IP ID of the 5 following packets, they’ll increment by one each time: 23547, 23548, 23549, 23550, and 23551. When Nmap analyzes these replies, it sees that it increments by one and determines this host is a good candidate for a zombie to be used during an idle scan.
When I read the Metasploit page about its “ipidseq” module, it said that the only difference Nmap’s check and its own implementation was that instead of using SYN/ACK packets for its check, it uses SYN packets. This confused me as I had just seen that Nmap’s NSE script was using SYN packets. This led me to jump over to Nmap’s page on it’s idle scan option (-sI). On this page I read that when you kick off an idle scan, Nmap will test the zombie host before actually doing the scan. So I ran Nmap again with the packet-trace option, this time just running an idle scan instead of using the NSE ipidseq script.
Mind you, I was on a different network when I took the below screenshot, so the IP’s differ from what you saw in the above screenshots.
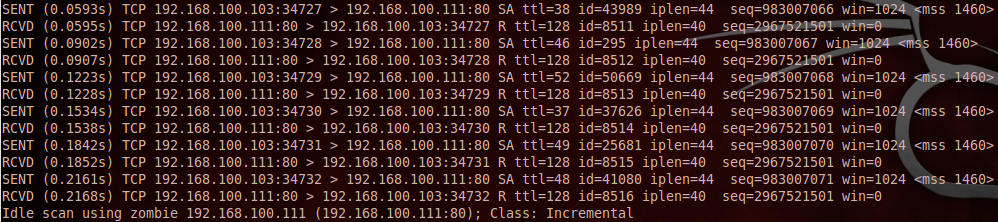
As you can see, Nmap does in fact use SYN/ACK packets to probe the zombie host. This must’ve been what the Metasploit ipidseq module page was referring to, not the NSE ipidseq script. This is a good tidbit of information to remember when you’re looking to run an idle scan, just in case your zombie is, or sits behind, a stateful firewall (learned about port scanning - SYN vs SYN/ACK - as it pertains to stateful vs stateless firewalls from watching Fyodor’s DEFCON 16 video).
Now that I know how the process works for finding a zombie host, it’s time to look under the hood to see how the idle scan works.
Executing the idle scan
Now to break down the idle scan as performed by Nmap. Again, we’ll use Nmap’s handy packet-trace option to see what’s going on.
Open port
- Attacker: 192.168.100.103
- Zombie: 192.168.100.111
- Target: scanme.nmap.org (74.207.244.221)
- Command: nmap -Pn -p 80 –packet-trace -sI 192.168.100.111 scanme.nmap.org
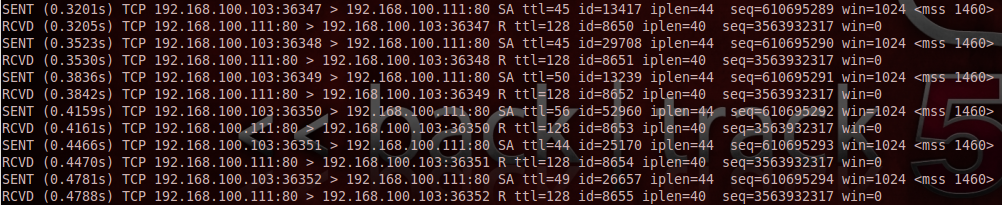
As you saw in the last screenshot of the previous section, Nmap likes to verify the zombie host to ensure it’s viable. Nmap sends 6 packets, each time checking the IP ID. As you can see, the IP ID increments 1 each time from 8650 to 8655.

Then Nmap runs another check, this time checking to make sure the target accepts spoofed packets and that the zombie hosts IP ID’s aren’t changed from host to host. What you see here is Nmap spoofing packets to the zombie making it look like they’re coming from the target. If this is a viable zombie, this should increment the zombie’s IP ID another four. So it should now be 8659. The attacker then sends another probe to the zombie host, this time not spoofing its source address, to see what it’s IP ID is now causing the zombie host’s IP ID to increment one more. And looking at the last line in the screenshot, we see that the zombie’s IP ID is now 8660 which is exactly what we wanted to see. Now Nmap begins the idle scan.

Here you see the attacker spoofs the packet sent to the target to make it look like it’s coming from the zombie. Then it sends a probe to the zombie host to check it’s IP ID, which in turn will cause the zombie to send a reply and increase its IP ID by one. In the above screenshot, we see the zombies IP ID is 8662, which is two more than when we checked before. This tells us the port is open on the target. How do we know this? We know that there was communication between the target and zombie before we probed the zombie for its IP ID again. Since the port was open, the target sent an ACK to the zombie. And being that this communication from the target was unsolicited, the zombie sent a RST packet; this increased the zombie’s IP ID by one. So when the attacker probed the zombie again, causing its IP ID to increment one again, we saw the increase as a total of two. This is the role the zombie host plays in an idle scan.
Closed Port
If the port were closed on the target, our spoofed packet would’ve caused the target to send a RST packet instead of an ACK packet to the zombie. And instead of the zombie seeing the ACK and sending a RST back to the target, it would’ve seen the RST packet and just ignored it. Therefore it’s IP ID wouldn’t have increased during this portion. And when the attacker probed the zombie, it would’ve seen the its IP ID only increased by one, which was caused by the probe itself.
Filtered Port
A filtered port would have the same result from the zombie’s perspective. But instead of the target sending a RST packet to the zombie, it’d simply ignore it. Still though, the zombie would never receive a packet from the target, therefore wouldn’t send have it’s IP ID incremented.
Conclusion
And that’s the TCP idle scan! Seeing Nmap’s packet-trace and Wireshark’s trace file during the idle scan helped me understand what exactly was going on. I hope this write-up is able to help somebody else as well. Now to continue on with my Metasploit book!